Originally published on StatsBomb.
Burnley enter the new season holding ‘the best of the rest’ crown following their highest place finish since 1974 last time out. The club are breaking new ground in their recent history, with a third consecutive season in the top flight plus the visit of European football to Turf Moor for the first time since the mid-sixties.
According to StatsBomb’s underlying numbers, Burnley’s finishing position was reasonably well-merited, with the ninth best expected goal difference in the league. That performance was powered by the sixth best defence in the league in both their outcomes and expectation. Fifty-four points wouldn’t usually be enough to secure seventh but Burnley can hardly be blamed for the deficiencies of others; eighth place Everton sitting on forty-nine points tells the story well on that front.
With all of the above considered though, seventh seems like the very top of Burnley’s potential outcomes given they don’t have the financial means to vault into challenging the top-six, so where do they go from here?
Defensive Foundations
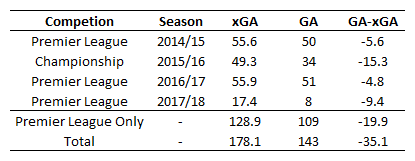
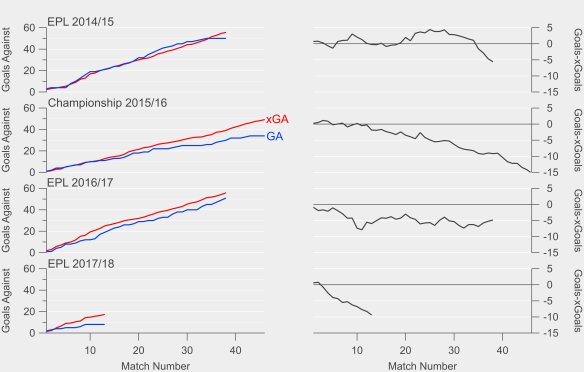
Unless this is your first time visiting StatsBomb towers, you’ll no doubt be familiar with Burnley’s annual dance with expected goal models. Over each of the last four seasons, they’ve conceded fewer goals than expected based on traditional expected goal models, with their extreme form of penalty box defending thought to at least partially explain these divergences.
StatsBomb’s new shot event data includes the position of the players at the moment of the shot and it’s fair to say that Burnley keep the data collectors busy. StatsBomb’s expected goal model includes all of that information and puts their average expected goal conceded per shot at 0.084, which is the lowest in the league by some distance. It’s an impressive feat and it is what powers their defensive performance as only Stoke City and West Ham conceded more shots last season, which would usually put you amongst the worst defensive teams in the league.
Sean Dyche has instilled a defensive system based around forcing their opponent’s to take shots from poor locations and getting as many bodies between those shots and the goal as possible, even if those bodies don’t necessarily pressure the shot-taker. To give an overall picture of this, Burnley’s shots conceded rank:
- Third longest distance from goal (the fundamental building block of expected goals).
- Lowest proportion of shots where only the goalkeeper was between the shot-taker and the goal.
- Fourth highest in density of players between the shot-taker and the goal.
- Seventh highest in proportion of shots under pressure.
- Ninth shortest distance between the shot-taker and the closest defender.
No other team comes close to putting all of those numbers together and when you add it all up you get a potent defensive cocktail that sees the highest proportion of blocked shots in the league and the lowest proportion of shots on target. Even with all that added to the model melting pot, Burnley still out-performed their expected goal figures to the tune of 12 goals, which is similar result to traditional expected goal models. However, StatsBomb’s model rates them more highly relative to the rest of the league. There was still some air in their numbers, but the process has a more-solid footing.
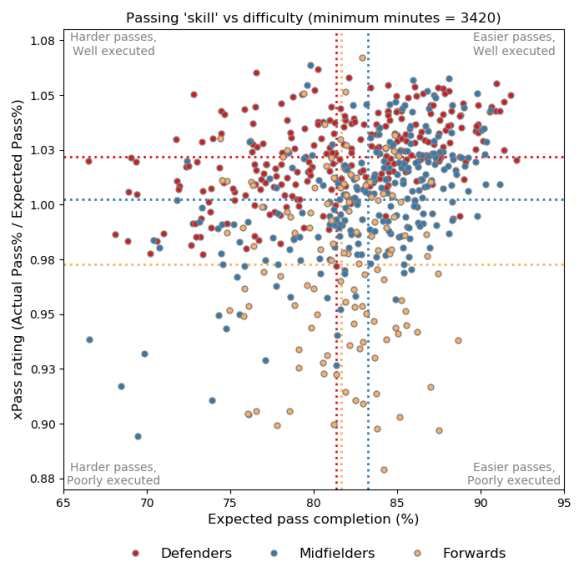
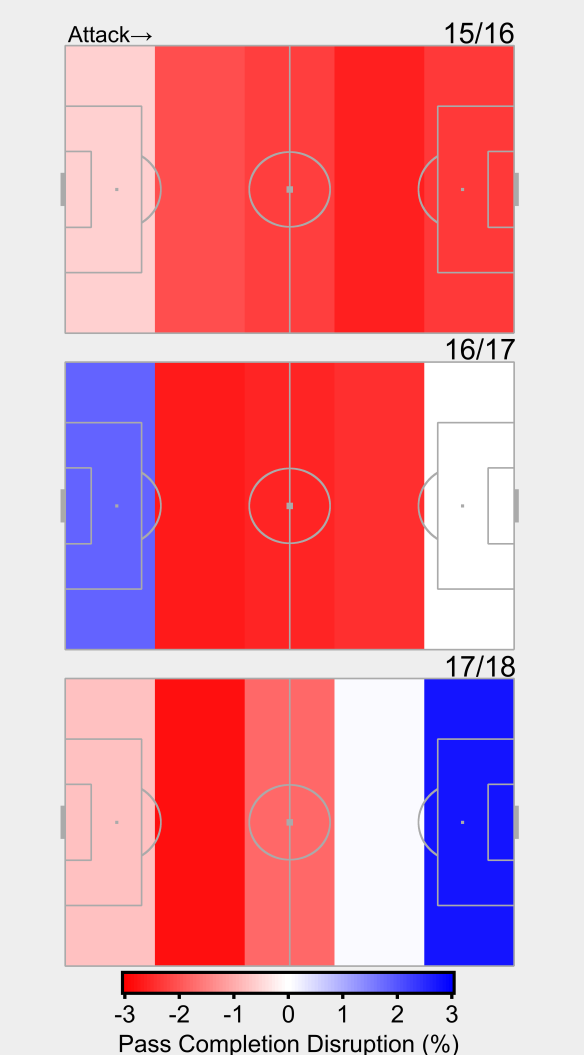
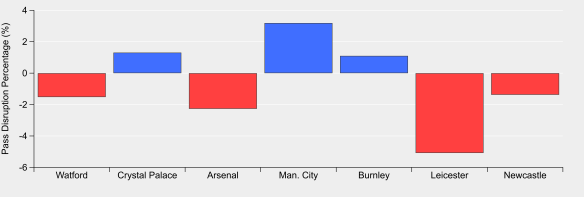
While their bunker-like approach might sound reminiscent of your ‘typical’ English defensive style, Burnley actually differ markedly further up the pitch where they apply a blanket of pressure on their opponents. The average distance of their defensive actions sat at a league average level, as did their opponent’s pass completion rate.

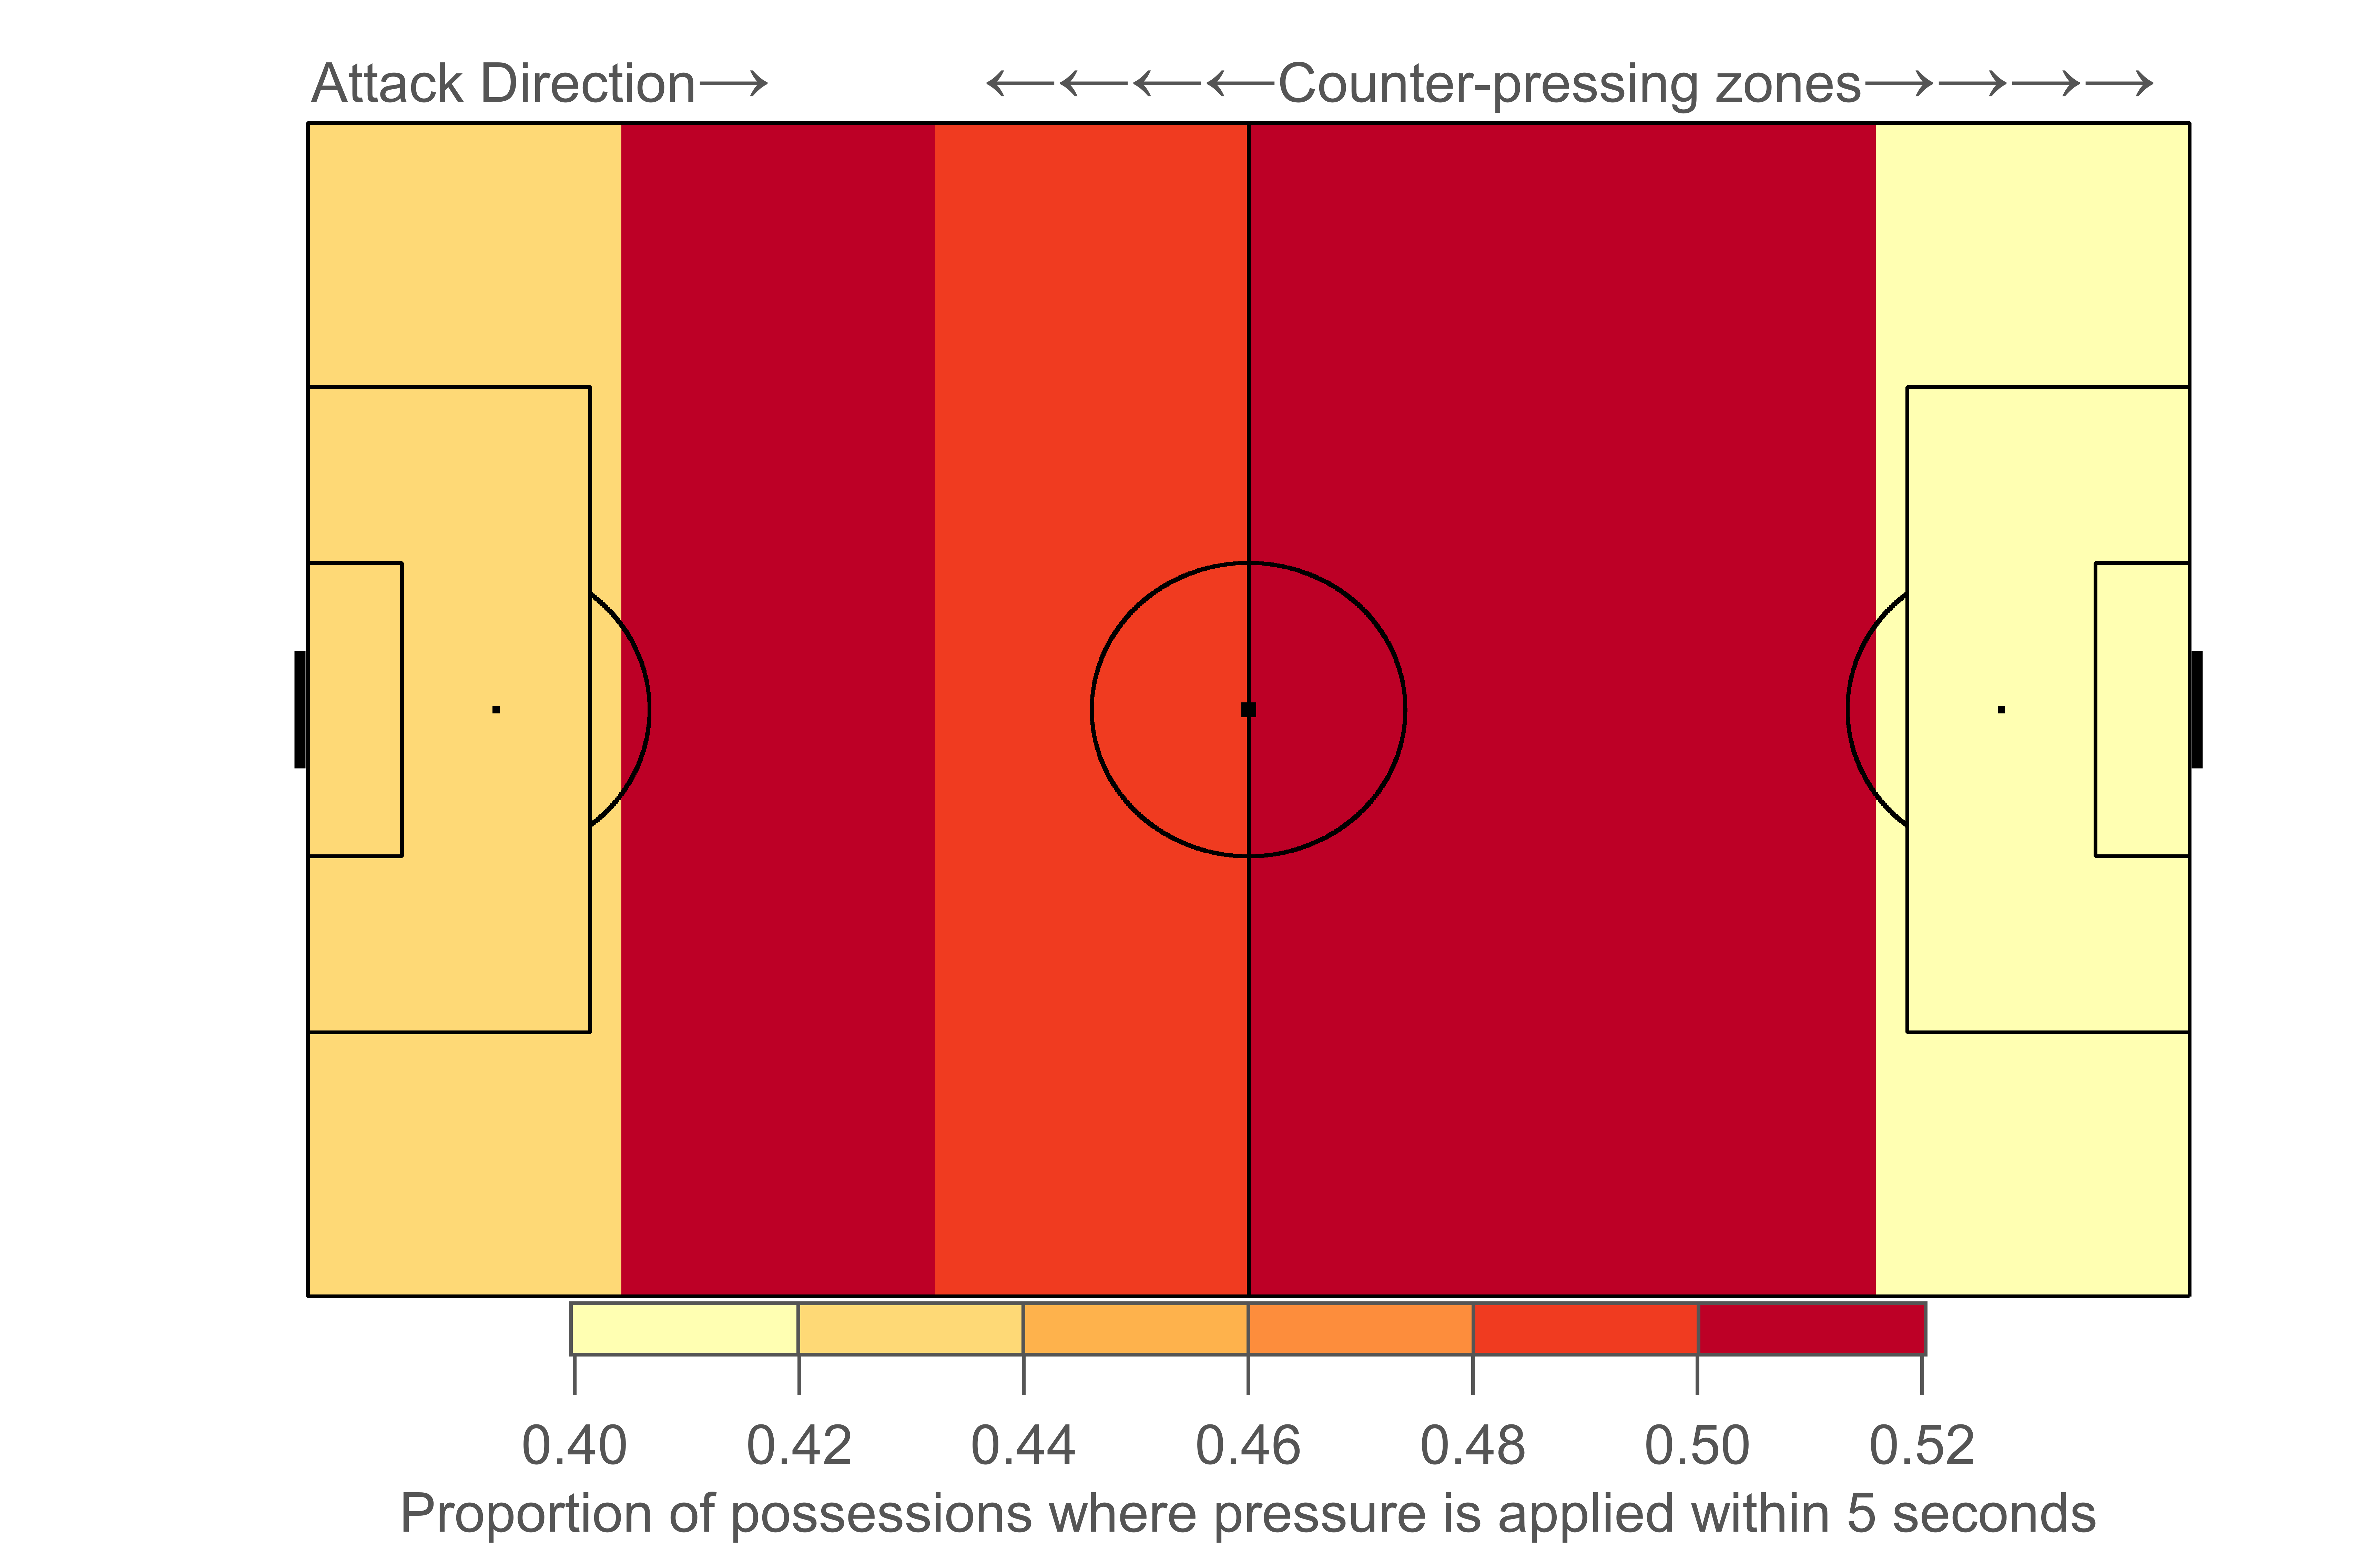
Burnley counter-pressed at a league average intensity, sitting tenth overall. Based on a simple model of the strong relationship between counter-pressing and possession, Burnley counter-pressed more than any other team relative to their level of possession. The midfield pair of Steven Defour and Jack Cork led their defensive-pressing efforts, with able support from their wingers and attacking midfielders.
Defence has been the bedrock of this Burnley side and there is no reason to expect 2018/19 to be any different.
Attacking Concerns
On the attacking end, Burnley were thirteenth in both shots (10.6) and expected goals (1.1) per game, which you can likely surmise meant their expected goal per shot was distinctly league average. They actually under-performed their expected goals to the tune of six goals, which caused them particular problems at home where they were down seven goals against expectation.
Chris Wood provided very good numbers in his debut season, contributing 0.45 expected goals per 90, which was tenth highest of players who played over 900 minutes and third highest of those not at one of the top-six. His shot map illustrates his fondness for the central area of the box, with his expected goals per shot sitting fourth of players taking more than one shot per 90 minutes. Even his shots from outside of the penalty area were reasonably high quality, with two of them coming with the keeper out of position and no defender blocking his path to goal, one of which yielded a goal against Crystal Palace on his full debut.

While Wood’s numbers were very good, there was a drop-off in goal-scoring contribution across the rest of the squad; Ashley Barnes and Welsh legend Sam Vokes were contributing at a 1 in 3 game rate in both expectation and actual output, with the midfield ranks providing limited goal-scoring support.
Wood’s medial ligament injury just before Christmas and two-month absence coincided with Burnley’s attack dropping below one expected goal per game. This was compounded by a poor run on the defensive side as well, leading to them collecting just 4 points in 9 games with Wood out of the starting eleven.

Gudmundsson carried the creative burden, with Brady chipping in when in the team but both relied heavily on set pieces when examining their expected assist contribution. Burnley were likely a touch unfortunate to not score more from dead-ball situations as their underlying process was good. However, there is certainly a lot of room for improvement in creativity from open-play.
With perhaps less scope for improvement on the defensive side, Burnley could do with improving their attacking output to really establish themselves in the top-half of the table. If Chris Wood can remain healthy and maintain his form then that would certainly help but ideally you would want to see an attack that is less reliant on one individual.
Transfers
From a departures point of view, Scott Arfield is the only player to leave who contributed reasonably significant minutes last season. After going most of the summer without an incoming transfer on the horizon, things have got busier over the last few days of the window
It is unclear whether proper football men or air-conditioned analytics practitioners were more excited by the signing of Joe Hart, with the latter intrigued how a goalkeeper with a history of poor shot-stopping numbers will fair at a club where the previous incumbents have consistently out-performed said numbers. With Nick Pope’s dislocated shoulder expected to keep him out of action for several months and Tom Heaton’s calf strain disrupting his own return from a dislocated shoulder, Hart is likely to start the season between the sticks.
Ben Gibson arrives from one of the better defensive teams in the Championship to provide competition and depth to the central defensive ranks. He could potentially ease Ben Mee out of the starting eleven and form a peak-age partnership with James Tarkowski once he is up to speed with Burnley’s defensive system.
Another arrival from the Championship is Matej Vydra, whose 21 goals last season saw him top the scoring charts, although his total was inflated by 6 penalties. His 15 non-penalty goals put him joint-fourth across the season in terms of volume at a rate of 0.50 goals per 90. However, his goal-scoring record over his career could be charitably described as ‘patchy’, while his two previous stints in the Premier League were mostly spent on the side-lines. Those concerns aside, the hope is that he can form an effective partnership with Wood and provide more creativity and a greater goal-threat than Jeff Hendrick, which is a practically subterranean low-bar.
Burnley have a recent history of reasonably successful recruitment from the Championship and are seemingly following that model again with the signings of Gibson and Vydra. Adding a more creative option in open-play looks like the area where they could have clearly upgraded the existing squad. It’s hard not to wonder whether they could have used their success last season and the draw of European football to improve their first-eleven. That said, being financially prudent isn’t the worst strategy and has seen them progress over recent years, so it’s hard to be too critical.
Where Do We Go from Here?
Burnley’s prospects this season are likely closely-tied to whether they qualify for the Europa League group stage. Injuries aside, they played essentially a first-choice team against Aberdeen, so are clearly aiming to progress. İstanbul Başakşehir are ranked 66th in Europe based on their Elo ranking, with Burnley in 53rd, so their tie is expected to be evenly-balanced.
Burnley ran with the most settled line-up in the league by a wide margin last season and squad depth is a major concern with the potential Thursday-Sunday grind that comes with Europa League qualification. Add in whatever the league cup is called this year and the next few months could be perilous.
The range of potential outcomes for this Burnley squad seems quite broad and the bookmakers are certainly unconvinced. On one end of the scale they could secure another top-half finish and put together a European adventure to bore the next generation of fans with, while on the flip-side they could struggle with the extra strain on the squad and find themselves at the wrong end of the table. The backbone of their past two campaigns has been their form in the first half of the season, which has kept them well-outside the relegation battle. That wasn’t the case in 2014/15 when they spent the entire season in the bottom four and struggled for goals when they needed to put wins on the board. A similar scenario playing out this term amidst a potentially stronger bottom-half could well be in play heading into 2019.
However, Burnley have made a habit of defying expectations and even have the opportunity to expand their exploits abroad this year. We’ll see if Sean Dyche can weave further sorcery from his spell-book.